Follow Me On Social Media!

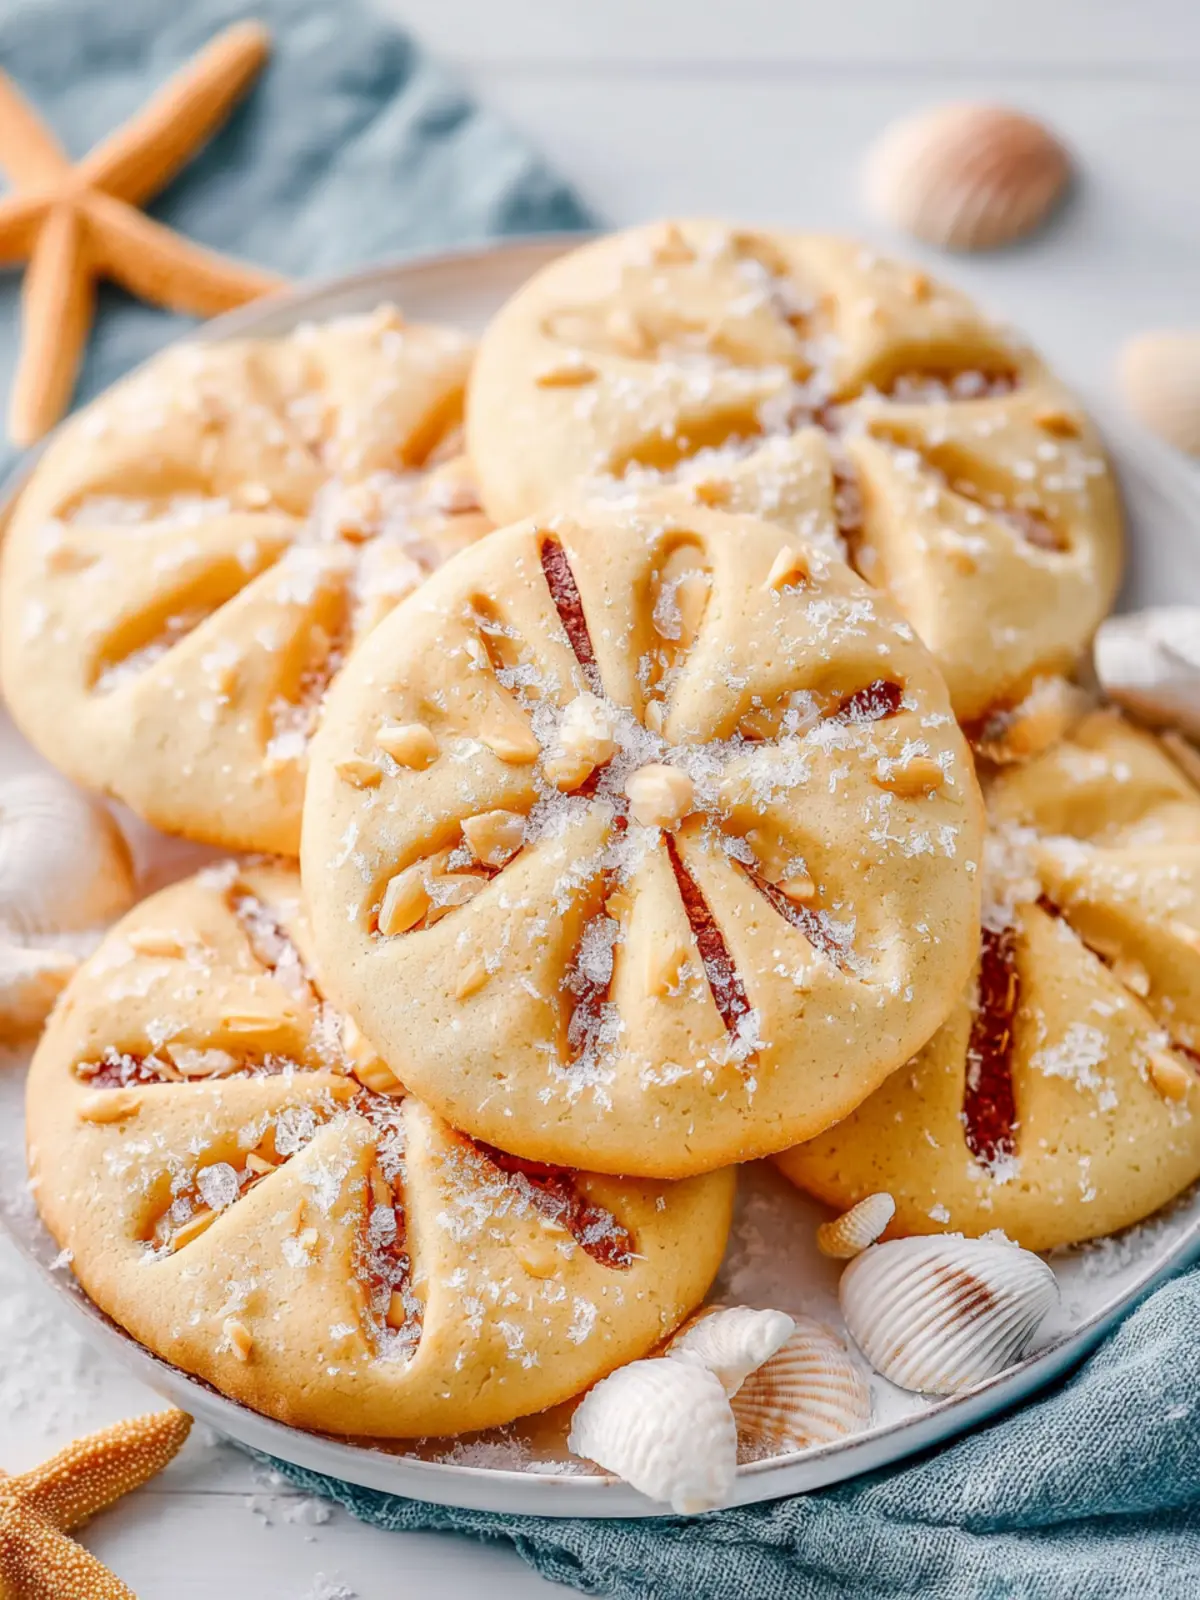
Sand Dollar Cookies: Irresistibly Sweet Beach Treats
Introduction to Sand Dollar Cookies
Each time I bite into a sand dollar cookie, I’m transported back to summer days spent lounging on the beach. The sun, warm on my skin, and the sound of waves crashing in the distance come rushing back as the sweet, buttery flavor melts in my mouth. Inspired by those beautiful seashells you find scattered along the shore, these cookies are a delightful blend of simplicity and charm, perfectly embodying the spirit of coastal living.
Sand dollar cookies are more than just treats; they’re a way to capture those golden moments and share them with friends and family. Whether you’re hosting a beach-themed party or simply looking for a tasty treat to enjoy at home, these cookies are sure to please. They are soft, subtly sweet, and have a distinct texture that makes each bite both interesting and enjoyable.
Imagine setting up your picnic blanket under a bright blue sky, surrounded by good company and laughter. What could be more satisfying than sharing a platter of homemade sand dollar cookies? Decorated to resemble their namesake, these cookies can also be a fun activity to involve your kids in; imagine getting creative with powdered sugar and chocolate to craft your own edible treasures.
Not only do they evoke nostalgia, but these cookies are also surprisingly easy to make! With just a handful of pantry staples, you can whip up a batch that will make your home smell delightful. Plus, the cookie dough can be prepared ahead of time and stored in the fridge, making these treats as convenient as they are delicious.
So, do you find yourself daydreaming of sandy shores and salty air? Let’s dive in and bring a piece of the beach right into your kitchen with these irresistible sand dollar cookies!

Key Ingredients for Sand Dollar Cookies
Butter: The foundation of our sand dollar cookies, butter provides that rich and creamy texture we all crave. Opting for unsalted butter allows you to control the saltiness of the dough while enhancing the overall flavor.
Sugar: Granulated sugar is essential in this recipe. It works wonders not only by sweetening these delightful cookies but also by contributing to their irresistible chewy texture.
Egg: A large egg at room temperature is a must-have! It binds all the ingredients together beautifully, adding moisture and richness that elevates the dough.
Almond Extract: This is where the magic happens. Almond extract infuses our sand dollar cookies with a delightful nutty flavor that makes each bite feel like a visit to a charming seaside bakery. Feel free to tweak the amount to suit your taste or even mix in a hint of vanilla for an intriguing twist.
All-Purpose Flour: Acting as the backbone of our cookies, all-purpose flour provides the necessary structure and stability to maintain that lovely sand dollar shape.
Sliced Almonds: These garnish our cookies perfectly, mimicking the design of real sand dollars while adding a satisfying crunch to each delightful bite.
Why You’ll Love These Sand Dollar Cookies
Imagine the joy of biting into a delightful sand dollar cookie, its buttery richness melting in your mouth as you savor the sweet, delicate flavors. This enchanting treat brings a touch of the seaside straight to your kitchen, making it a perfect companion for any gathering or a sweet reward after a long day.
What sets these sand dollar cookies apart? For starters, the simplicity of the recipe means that even novice bakers can create these gorgeous confections. Just gather your ingredients, and in no time, you’re ready to indulge in something truly special.
-
Rich in Flavor: The blend of vanilla extract and buttery goodness creates an irresistible taste that adults and kids alike will love!
-
Adorable Presentation: Each cookie, resembling a sand dollar, becomes a conversation starter at parties and a lovely gift for friends.
-
Versatility: You can add your own twist with sprinkles or flavored icing, making them a versatile addition to your baking repertoire.
Baking these sand dollar cookies brings warmth and joy, filling your home with delightful aromas that beckon everyone to the kitchen. So grab your apron and get ready to whip up a batch of joy!

Tips for Making Perfect Sand Dollar Cookies
Creating sand dollar cookies is more than just following a recipe; it’s about immersing yourself in the process to ensure that every batch turns out perfectly delightful. Here are some tried-and-true tips to elevate your cookie game.
Choose Quality Ingredients
-
Butter: Opt for high-quality unsalted butter for the best flavor. It should be at room temperature, allowing it to cream perfectly with the sugars, resulting in a rich, smooth dough.
-
Sugar: Use a mix of granulated sugar and powdered sugar for a well-balanced sweetness. The powdered sugar will lend a tender texture that melts in your mouth.
Perfecting the Dough
-
Chilling is Key: After mixing your dough, chill it for at least 30 minutes. This helps the cookies maintain their shape while baking and allows the flavors to meld together beautifully.
-
Uniform Size: For consistently shaped cookies, consider using a cookie scoop or measuring spoon. This ensures even baking and a polished presentation.
Baking Tips for Success
-
Preheat Your Oven: A properly preheated oven guarantees that your cookies bake evenly. Make sure your oven reaches the right temperature before placing the cookies inside.
-
Check for Doneness: Pull the cookies out when they’re just set but still slightly soft. They’ll continue cooking on the baking sheet after being removed from the oven, resulting in a perfectly chewy texture.
By following these tips, you’ll be well on your way to creating delectable sand dollar cookies that impress family and friends alike!
Time Details for Sand Dollar Cookies
When you’re ready to bake sand dollar cookies, it’s important to know the ideal timings to ensure the best results. Here’s everything you need to plan out your baking adventure!
Preparation time
To create these delightful cookies, set aside about 20 minutes for preparation. This includes measuring out your ingredients and mixing the dough to perfection.
Chilling time
Once the dough is ready, it’s essential to let it chill in the refrigerator for at least 1 hour. This helps the cookies maintain their shape and enhances the flavors.
Baking time
Baking your sand dollar cookies will take around 10 to 12 minutes. Keep a close eye on them until they are lightly golden on the edges for that perfect texture.
Total time
In total, you’re looking at approximately 1 hour and 30 minutes from start to finish, including preparation, chilling, and baking. It’s well worth the wait for these scrumptious treats!

Nutritional Information for Sand Dollar Cookies
When it comes to enjoying sand dollar cookies, knowing their nutritional profile can enrich your experience. These delightful treats not only taste great but also have a surprising amount of wholesome goodness packed inside.
Calories
Per cookie, you can expect about 120 calories. That makes them a perfect snack to satisfy your sweet tooth without feeling guilty.
Protein
Each sand dollar cookie contains approximately 2 grams of protein. While they aren’t a major source of protein, every little bit helps, especially when paired with a glass of milk!
Sodium
With around 50 mg of sodium in each cookie, they’re pretty moderate on salt content. This means you can indulge a bit while still keeping an eye on your overall sodium intake.
Enjoy your baking adventure with these effortlessly charming cookies!
FAQs about Sand Dollar Cookies
Baking sand dollar cookies is not only about mixing ingredients; it’s a delightful journey that transforms simple elements into treasures right from your kitchen. Below are some frequently asked questions to guide you through the process with confidence!
Can I substitute almond extract with other flavors?
Absolutely! While almond extract adds that unique flavor to your sand dollar cookies, you can experiment with alternatives. If you’re not a fan of almond, vanilla extract works wonders as a substitute, offering a more classic sweet flavor. For a citrusy twist, consider using lemon or even orange extract, which can brighten up your cookies and give them a refreshing taste. Experimenting is often the best part of baking!
How do I know when the cookies are fully baked?
Perfectly baked sand dollar cookies should have a light golden edge but still be soft in the center. Since every oven is different, it’s wise to start checking them a minute or two before the suggested baking time. A gentle press on the top should yield a slight bounce but not leave any indentations—this means they are ready to come out. Trust your senses; the warm, buttery aroma is also a good hint that they’re close!
Can I freeze Sand Dollar Cookies?
Yes, you can definitely freeze sand dollar cookies! After baking, let them cool completely. Then, place them in an airtight container or a freezer bag, separating layers with parchment paper if necessary. They can be frozen for up to three months. When you’re ready to enjoy them, simply thaw at room temperature and savor the delightful flavors, as if they were just baked!
Conclusion on Sand Dollar Cookies
Baking sand dollar cookies is more than just following a recipe; it’s an experience that celebrates both creativity and comfort. The delightful blend of buttery flavors and the enchanting simplicity of their design make these cookies a fun treat to share with friends and family.
- Perfect for Any Occasion: Whether you’re hosting a beach-themed party or just looking for a sweet snack, these cookies will impress anyone.
- Customizable: Feel free to experiment with flavors, adding your favorite spices or extra chocolate chips to make the recipe your own.
Ultimately, making sand dollar cookies is a wonderful way to create cherished memories in the kitchen, one delicious bite at a time.
Print
Almond Butter Cookies
- Total Time: 1 hour 12 minutes
- Yield: 24 cookies 1x
- Diet: Vegetarian
Description
Delicious almond butter cookies with a crispy edge and soft center.
Ingredients
Scale
- 12 tablespoons butter
- ½ cup granulated sugar
- 1 large egg (room temperature)
- 1 ½ teaspoons almond extract (or to taste; vanilla extract may be substituted or added in addition)
- 2 cups all-purpose flour
- Sliced almonds (as needed)
Instructions
- To the bowl of a stand mixer fitted with the paddle attachment (or a large mixing bowl and handheld electric mixer), add the butter and sugar, and be on high speed to cream them until light and fluffy, about 3-4 minutes. Stop and scrape down the sides of the bowl.
- Add the egg and almond extract, and beat to incorporate, about 1 minute. Stop and scrape down the sides of the bowl.
- Add the flour (and 1/2 tsp salt if you’re using unsalted butter) and beat on low speed until just incorporated and a smooth dough forms.
- Pat the dough into a large ball, wrap it with plastic wrap, and place it in the refrigerator to chill for 1 hour.
- Preheat oven to 350F and line 3 baking sheets with parchment paper.
- Lightly flour your clean countertop, place the chilled dough on it, and using a lightly floured rolling pin, roll out the dough to about 1/4-inch thickness.
- If the dough seems too sticky, put a little more flour on the rolling pin or lightly sprinkle it on the dough itself. Or place it back in the fridge for 5-10 minutes and that’ll help it firm up and you can try again to roll it out.
- After the dough has been rolled out, cut the dough into round discs using a 2 1/2-inch cookie cutter. Place the discs onto a parchment lined baking sheet, adding no more than 12 per baking sheet. You can re-roll the dough scraps and cut them out.
- Place 5 almond slices gently into the center of each disc, arranged like flower petals, to create a sand dollar appearance.
- Squeeze a plastic straw into an oval shape or use an exacto knife to create the small holes on each piece. Then use a toothpick to remove the dough from the straw. Discard these little pieces of dough.
- Bake the cookies for approximately 10-12 minutes (start checking earlier than that) or until the edges are lightly golden brown.
- Allow the cookies to cool on the baking sheet until they’re cool enough to transfer to wire racks to cool fully.
- Optionally before serving, you may dust the cookies with a bit of powdered sugar or cinnamon sugar, depending on your preference.
Notes
- You don’t have to make as many holes as I made in my cookies because it is a bit time-consuming and they don’t have to look perfect, just do your best.
- Keep a very close eye on the cookies because they’re very thin and they’ll bake quite quickly.
- If possible, recommend baking one sheet of cookies at a time, using the center oven rack, and rotating the baking sheet once midway through baking for optimal browning.
- In some ovens, the baking time may be more than suggested.
- Prep Time: 1 hour
- Cook Time: 12 minutes
- Category: Dessert
- Method: Baking
- Cuisine: American
Nutrition
- Serving Size: 1 cookie
- Calories: 150
- Sugar: 6g
- Sodium: 50mg
- Fat: 8g
- Saturated Fat: 5g
- Unsaturated Fat: 2g
- Trans Fat: 0g
- Carbohydrates: 18g
- Fiber: 1g
- Protein: 2g
- Cholesterol: 15mg